Product Photography Tips for Makers: A Simple Phone Shot List
Product photography tips for makers: use a phone, window light, and a six-view shot list to show each handmade item clearly and keep photos easy to find.
By Small Business Bundle by Cosmo Suite · Editorial policy
Published · 8 min read
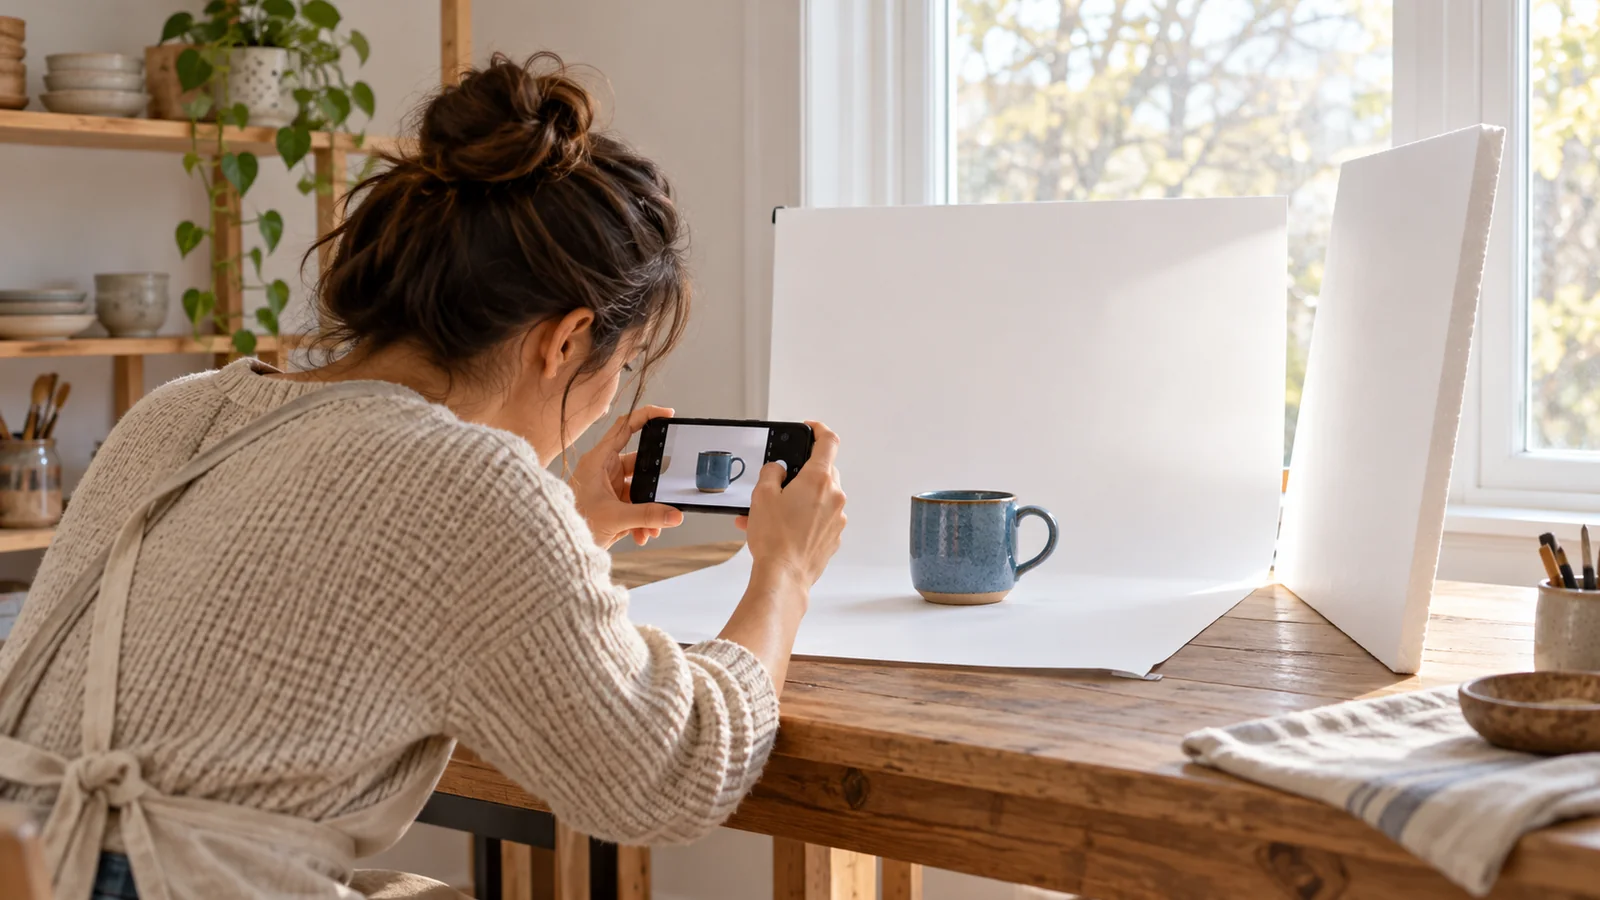
Product photography tips for makers start with three things: a phone, soft light from a window, and a short list of views to capture. You do not need to buy a camera before you can make useful photos. First, make it easy for a buyer to see what the item is, how it is made, and what comes with it.
Product photography is a set of images that shows an item clearly from the views a buyer needs before ordering. For a handmade listing, that may include the full item, a detail, its scale, and what arrives in the package.
Set one product on a clear surface near a window. Keep the phone steady and take the same set of views for each item. Then name the files so you can find them when you update a listing or work on an order. This guide covers the setup and a repeatable routine. It does not promise a particular sales result.
Product Photography Tips at a Glance
Use each photo to answer one question a buyer may have. A six-view set gives you a practical starting point for a handmade listing.
| View | What it shows | Buyer question |
|---|---|---|
| Front or hero | The whole item from its clearest angle | What am I looking at? |
| Side or alternate angle | Shape, depth, or construction | What does it look like from another side? |
| Back or underside | Finish, fastening, label, or base | What will I see when I use or handle it? |
| Detail | Texture, join, clasp, stitching, or glaze | How is this part made? |
| Scale or context | The item beside a familiar object or in use | How large is it? |
| Packaging or included parts | Box, set pieces, or accessories that are included | What arrives with my order? |
The exact set depends on the product. A pair of earrings may need a close detail and a worn view. A ceramic bowl may need an overhead view and a side view that shows its depth. Keep props simple, and make clear which objects are included. If you sell on a marketplace, check its current image requirements before choosing a hero image or adding text.
Build a Window-Light Setup With What You Have
Put a table near a window and start with the window to one side of the product. Soft side light shows shape and texture. Direct sun can make bright patches and hard shadows, so move the table back or wait for softer light if the sun lands on the set.
Shopify's product photography help guide recommends a room with a window and describes how window distance changes the light and shadows. Its setup also calls for a table, a background, and a reflector card. A sheet of white paper or a piece of poster board can bounce some light toward the darker side of an item.
Keep other room lights off while you shoot. A lamp and daylight can have different color casts, which makes one item look warm and another look cool. Move the product or the phone by small amounts, then look at the preview before you take the full set.
For a plain background, curve a large sheet of paper or light card from the table up behind the item. Tape it in place outside the camera frame. This removes a hard corner from the picture. Choose a background that separates from the item: white on a pale product can hide its edge, while a mid-tone background may show it more clearly.
Set the phone on a stack of books, a shelf, or a small stand if your hands make the frame wobble. Shopify's guide notes that a tripod can help keep the camera in the same position through a shoot. A stable phone also makes it easier to compare the framing of several items. Turn off flash, clean the lens, and tap the product on screen to focus.
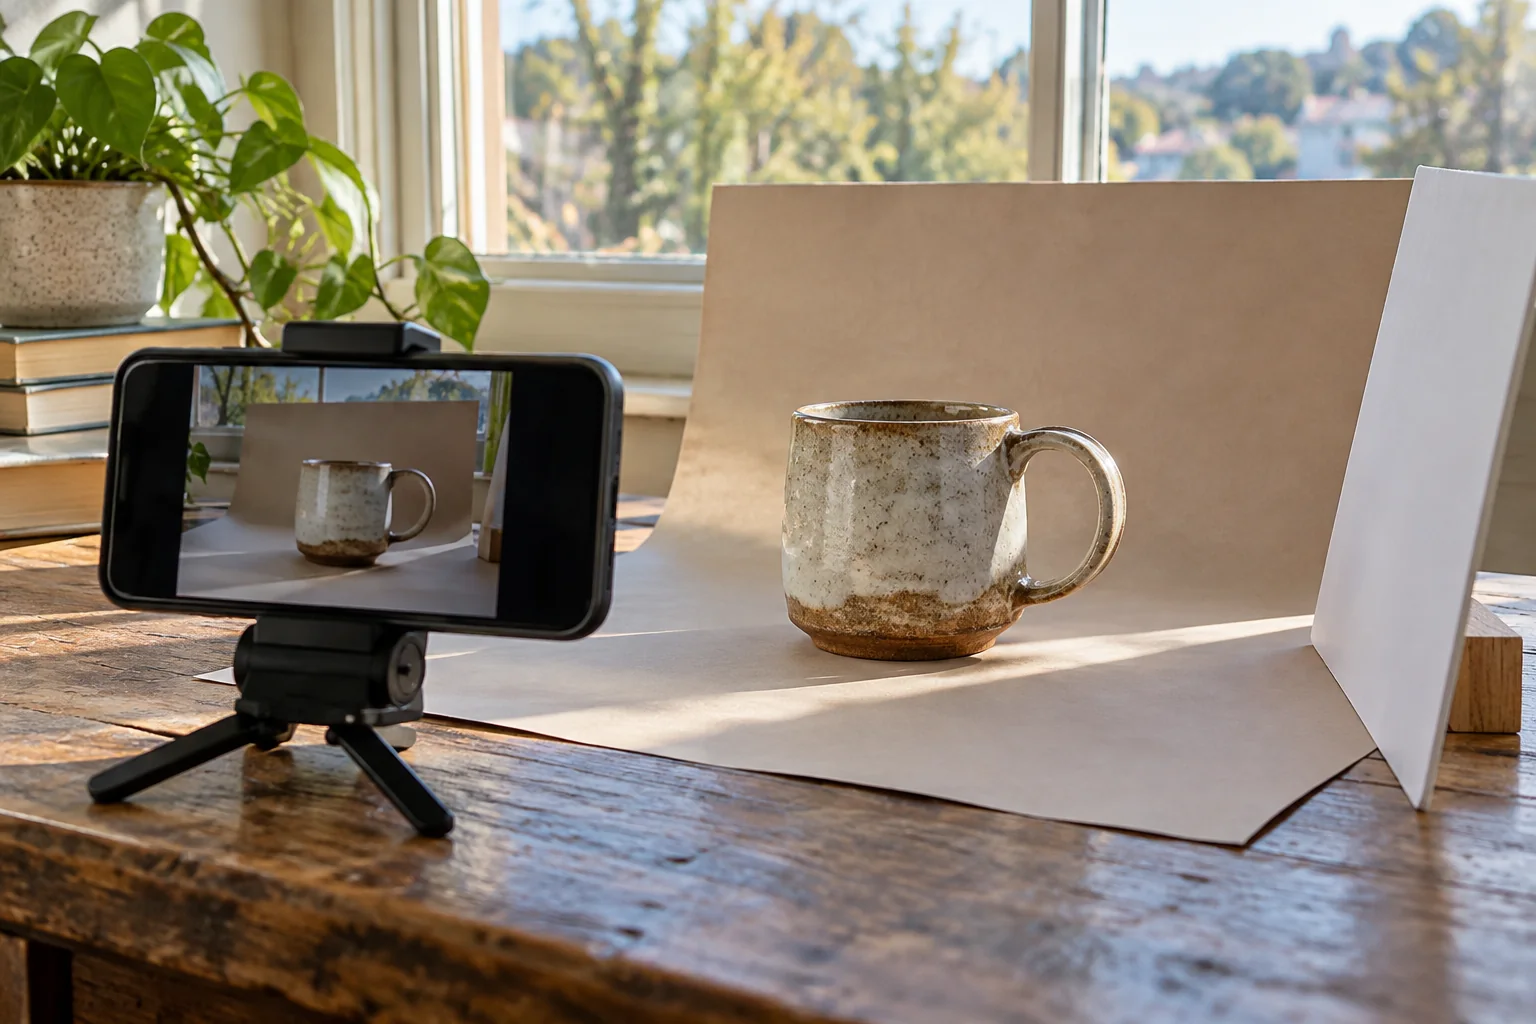
Prepare the Item and Frame the Shot
Clean and arrange the item before you start. Dust, fingerprints, loose threads, and bent labels are easy to notice in a close view. For fabric, smooth the surface. For a small object, check that its parts sit in the position a buyer will receive them.
Choose the camera angle based on the item. Hold the phone around the item's center for a straight-on view. Use an overhead view for a flat product or a set of small parts. Keep the edges of the item inside the frame, and leave enough room to crop for the destination later.
Avoid digital zoom when you can move the phone closer. The Shopify Help Center explains that digital zoom crops the image and reduces quality. Instead, step closer, take the photo, and crop a copy. Do not crop so tightly that a clasp, handle, or edge disappears.
Look at the photo at full size before you move the setup. Check that the focus is on the detail that matters, the whole item is visible, and the color still looks like the real object. If it looks too dark, move the product closer to the window or use a white reflector. Editing cannot put back a detail that was hidden in shadow or left outside the frame.
Use the Shot List for Each Handmade Item
The six views work best when each one has a job. Here is how they might apply to a fictional blue ceramic mug. This is an example of planning, not a tested product listing.
Start with the front or hero view. Turn the mug so its handle and glaze are easy to see. Take a side view to show the curve and depth. Photograph the base if the foot, maker's mark, or underside finish matters. Use a close detail for the glaze texture or handle join. Add a scale view with the mug beside a familiar object, or show it in a normal setting. Finish with the packaging view only if the packaging or included pieces are part of the offer.
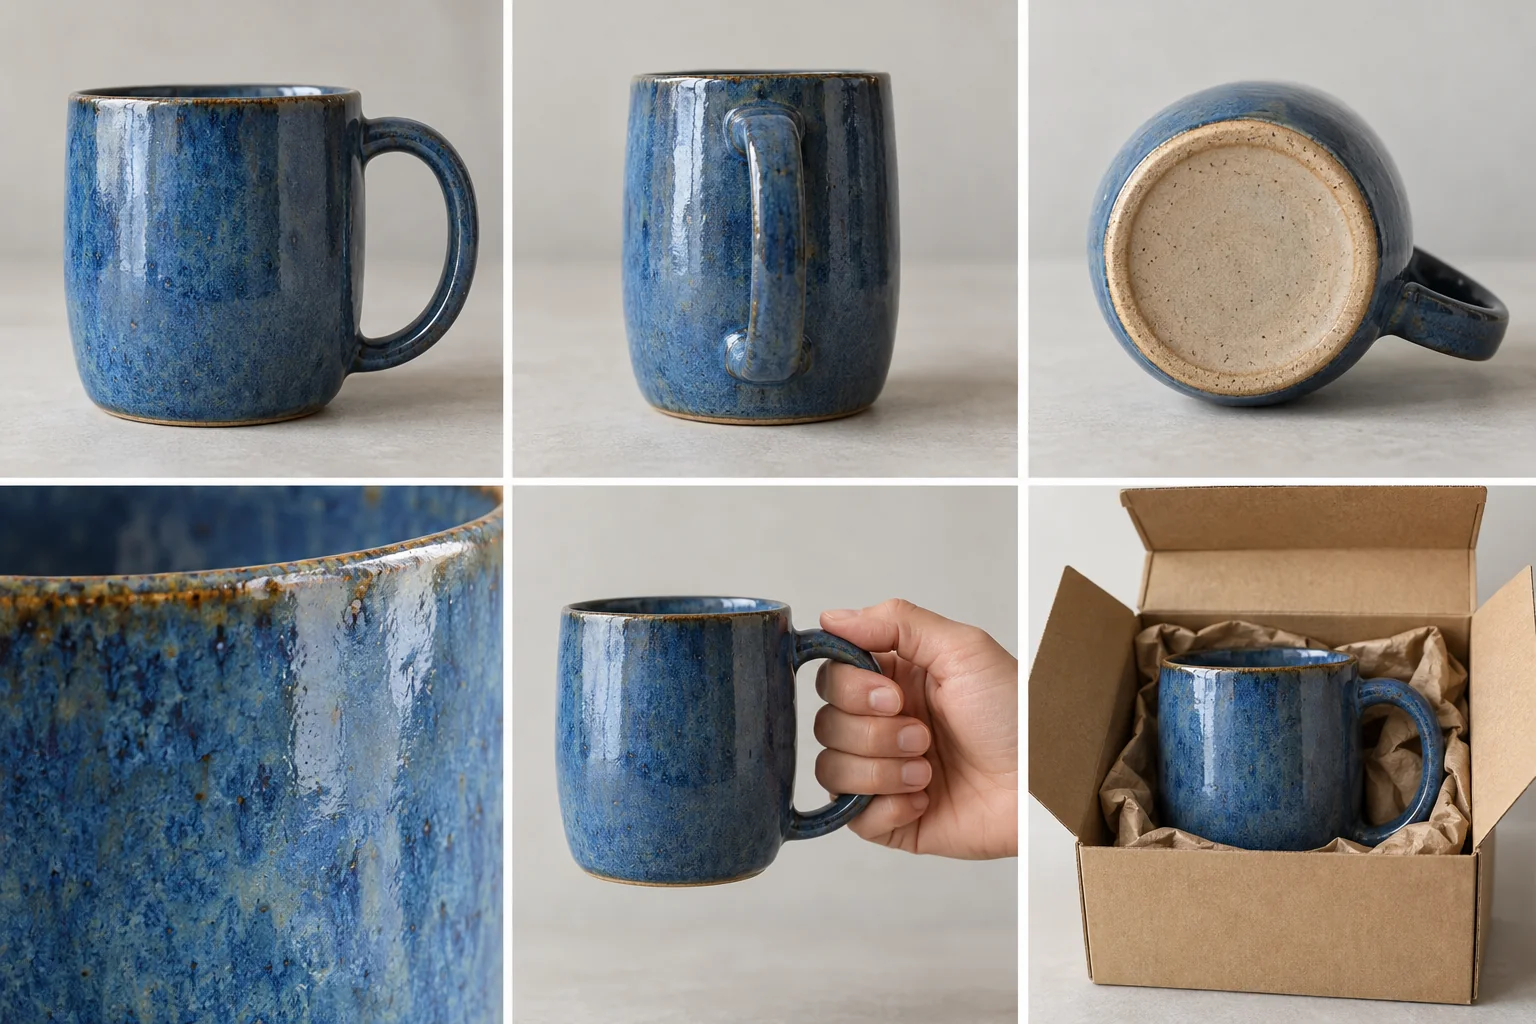
For each image, ask whether a buyer can tell what they are seeing without guessing. If a prop could look like an included item, either remove it or label the image clearly. Use a scale reference only when it gives a fair idea of size. A photo can show the item beside a ruler or a hand, but it should not make a small object look larger than it is.
The FrameOnce guide on smartphone product photography is a commercial vendor's overview of phone settings, backgrounds, and lighting. Its equipment recommendations are optional. The useful starting point here is simpler: choose the views before the shoot, keep the light steady, and check that each frame answers a real question.
Keep a Shoot Repeatable Across a Small Catalog
Consistency comes from repeating the parts of the setup you can control. Use the same table, background, window, and phone position for similar products. If the weather or time of day changes the light, pause and compare the preview with an earlier photo before you continue.
Shoot similar items together when the setup remains the same. Keep a short note with the background, window direction, phone height, and useful angle. If you change the glaze, material, or packaging, take a new detail or included-parts photo. Do not keep an old photo simply because the rest of the set matches.
The Shopify DIY photography guide, updated June 30, 2026, covers image types, setup choices, and platform requirements. Platform specifications can change, so check the current rules for Etsy, Shopify, or the channel where you list. Do not assume one square crop or background rule fits every marketplace.
If you photograph one-off or custom orders, keep the image files separate from customer details. A file name can use an order number or batch code you already recognize. Avoid a customer's full name, address, phone number, or other private information in the filename.
Name and File Photos So You Can Find Them
Use the same filename pattern every time: item, order or batch reference, view, and version. For example, blue-mug-O104-detail-v1.jpg says what the photo shows and connects it to a reference without using a customer's name. Replace O104 with an order code you already use, or use a batch reference for items that are not made to order.
If you take a replacement photo, keep the old file until you know the listing uses the new one. Increase the version at the end, such as v2, and note which one is current in your own working record. Keep original photos in one folder and upload-ready copies in another if that helps you avoid overwriting the original.

An order tracker spreadsheet can record an order ID, item, and status. It does not store photos or manage image files. Use the code in your filename only when it is useful to your own workflow, and keep customer information out of public image metadata and filenames.
Edit Lightly and Check Before Uploading
Small edits can fix a crooked frame or a slightly dark image. Crop away empty space, straighten the horizon, and adjust brightness or white balance in small steps. Compare the result with the real item as you edit. A red glaze should not become orange, and a fabric texture should not be smoothed into a different finish.
Avoid adding objects, changing the item's shape, or hiding a flaw that affects what the buyer receives. If a variation has a different color or size, photograph that variation instead of recoloring another item's image. Clear photos help prevent confusion after an order.
Before uploading, open the file and check that it is sharp, the full item is visible, and the crop fits the channel. Check that the filename is clear, the image shows the version you sell, and any props are not mistaken for included parts. Follow the marketplace's current rules for file size, dimensions, backgrounds, and image overlays.
If you change a listing photo, note the date and what else changed around the same time. The Etsy SEO test log guide shows a simple way to keep that record.
How Small Business Bundle Handles This
Small Business Bundle includes an Order & Customer Tracker spreadsheet. It can help you record an order and its status. It does not take photos, edit them, or organize image folders. Keep the photos in your own device or storage system, then use an order reference in the filename if that helps you connect the work.
If you also want spreadsheets for recording orders and other small-business details, see the Small Business Bundle spreadsheet collection. It is a spreadsheet bundle, not a photo tool. The order tracker guide explains a simple way to record each order's next step.
Why Trust This Article
The Shopify Help Center, Shopify's June 30, 2026 DIY guide, and FrameOnce's smartphone guide were checked on November 2, 2026. The steps here are a practical summary of those sources and an illustrative workflow. We did not conduct a seller test, and the example product and order code are fictional.
Small Business Bundle is published by Cosmo Suite. See the publisher's about page and editorial policy for more about the site and its content process. The illustrations for this article are AI-generated and show fictional setups.
Frequently asked questions
How do I take good product photos with my phone?
Set the item near a window with soft light, use a plain background, steady your phone, and take several views that answer buyer questions. Keep the product color and details true to life.
What is the best lighting for handmade product photos?
Start with indirect window light from one side. Avoid harsh direct sun and turn off room lights that add a different color. A white card on the shadow side can bounce some light back.
What photos should I take for each product listing?
A useful starting set shows the whole item, another side, the back or underside, an important detail, the item in context for scale, and packaging or included parts when those matter.
How can I make product photos look consistent?
Use the same background, window position, camera height, and framing for similar items. Save a short setup note so you can repeat it, and retake a view when the light or product changes.
How should I name product photos?
Use a predictable name with the item, order or batch reference, view, and version, such as blue-mug-O104-detail-v1. Keep customer names, addresses, and other private details out of filenames.
Can I edit handmade product photos?
You can crop, straighten, and make modest exposure or white-balance adjustments. Keep the item's color, texture, size, and included parts accurate, and check the current image rules for the marketplace where you sell.
